|
The PuTTY Terminal Program
|
SSH or Secure SHell is a standard
Internet protocol for encrypted remote login sessions. MS
Windows does not include an ssh client. Many versions
include a similar client called telnet that does not support
encryption. So if one is going to do much remote work from a
Windows system, one probably wants to find and download an ssh
client.
One client that I can recommend is
PuTTY. This application is freeware (meaning it costs nothing),
and it can be configured to use SSH (Secure SHell)
to encrypt information before sending it across the Internet,
thereby making the communication more secure. This handout
describes the steps one can take to install and use PuTTY on an
MS Windows computer.
- Visit the PuTTY Web site, http://www.putty.nl.
- Click on the Download
link.
- Under the header "For Windows on Intel x86", download the
file putty.exe (using the HTTP option worked best
for me).
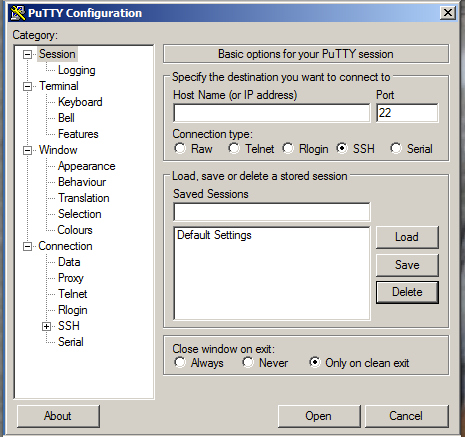
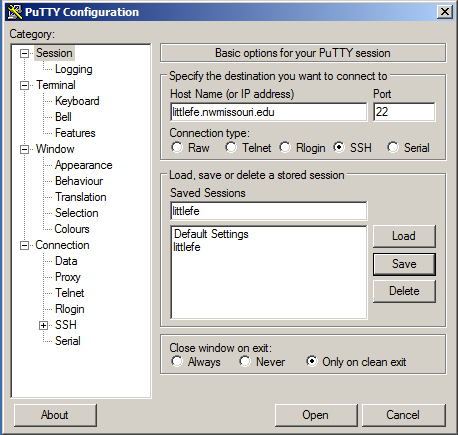
- Run putty.exe; a dialog window such as the
following should appear:
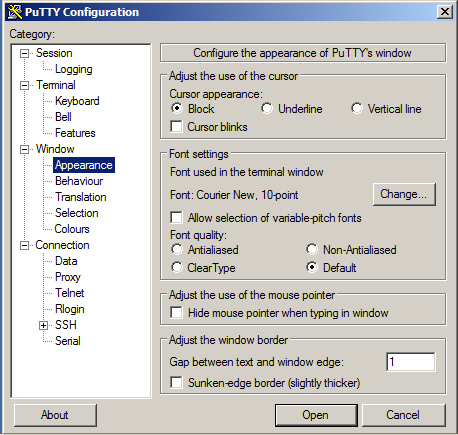
- The default font for PuTTY is Courier 10-point, which is
pretty small in most screen resolutions. To change the font
and/or font size, click on the Appearance item in
the category list, then click on the Change...
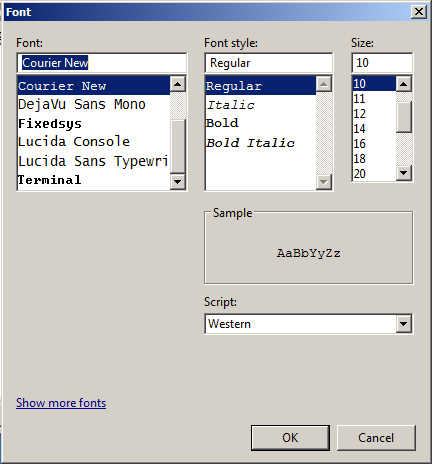
button under Font used in the terminal window. A
font selector dialog such as the following appears. Choose the
font and font size desired, then click on the OK
button; this takes one back to the previous dialog (the one
with the Appearance item selected), and the new font
should appear under Set the font used in the terminal
window.
- Click on the Session item in the category list. Ensure
that the connection type is SSH. Type littlefe.nwmissouri.edu in the Host
Name box as shown below:
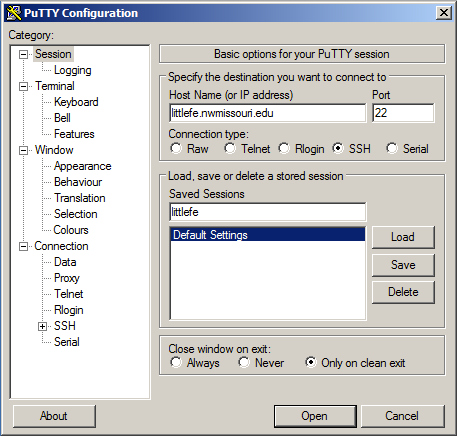
- To save the changes made (so that PuTTY can be started using
the changes), type littlefe in the Saved
Sessions box. The dialog should now look like this:

- Click on the Save button, and littlefe
should appear in the Saved Sessions list. PuTTY has
now saved the configuration changes under the name littlefe.
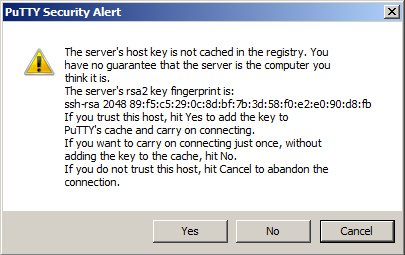
- To actually start using PuTTY, click on the Open
button. The first time you use PuTTY with a given computer
(such as CSA), a warning dialog appears; click the Yes
button.
- The PuTTY terminal window now appears, as shown below. Enter
your user ID and password.
What about the next time I
use PuTTY?
Every time one starts PuTTY, one is
presented with the configuration window. If one saved a
configuration, one can use it. When the configuration window
appears, click on littlefe in the Saved Sessions
list, then click on the Load button; littlefe.nwmissouri.edu
should appear in the Host Name box and SSH
should appear selected under Protocol. Click on the Open
button, and the PuTTY terminal window should appear, as
shown above.


